Finally after an extremely long wait, our orders have finally arrived!!!
Martha Stewart Circle border punch starter sets Can Be found here
We Are Memory Keepers Envelope boards Can be found here
We have more great items new in store, check out Scrapbooking Blossom to see whats new :)
Thursday, June 6, 2013
Wednesday, May 29, 2013
Fiskars AdvantEdge Punch Systems
Hey all, the Fiskars AdvantEdge Punch Systems sold out super fast.
I have managed to get some more in but have only one left!
View Here
We also have only two Kaisercraft Storage Turn Tables left. They sold like hotcakes.
More stock added soon!
Update for everyone patiently waiting for the Martha Stewart circle border punches they are on their way!
I have managed to get some more in but have only one left!
View Here
We also have only two Kaisercraft Storage Turn Tables left. They sold like hotcakes.
More stock added soon!
Update for everyone patiently waiting for the Martha Stewart circle border punches they are on their way!
Tuesday, May 14, 2013
Shabby touch Bird House
Hello All
Been a while since I made anything, I stumbled across this little Bird House reduced to $2 in Kmart!
Bargain!!!
I have been looking for something to use the new Kaisercraft True Romance Range on, and this was perfect!
I replaced the little wooden Peg with a Tim Holtz knob, Added some lace and ribbons, Flowers and crystals etc.
Then used mod podge for the paper on the roof and the embellishments all around.
I really like how this turned out :)
Bye for now!
Then I found a cute little bird today in another cheapie store, Perfect and exactly what I wanted :)
Thanks for stopping by :)
Friday, May 10, 2013
New Fiskars AdvantEdge cutting system
I had a quick play today and all I can say is fantastic!
Takes all the guess work out of lining up your punches!
Does it for you!!! Quick and easy!
I have sold out already but will be ordering in more starter sets.
If your interested please email
admin@scrapbookingblossom.com.au
Monday, April 8, 2013
Make your own Rosettes
I will try to explain as clear as possible, Not very good with instructions though I am afraid lol
Here goes :)
Here goes :)
Start off with a 12 Inch strip by 2 Inches or 2 1/2 etc depending on how big you want them.
I made mine 2 and a half inches because I then used a
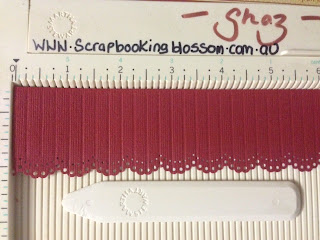
Using a Martha Stewart Scoring Board score each line as shown in picture.
You are then going to fold each line in mountain then Valley fold.
How it will look when Folded.
Glue both ends together to form a circle like above, then use any circle punch for the backing piece which you will glue your Rosette on to hold in place.
Add your glue then carefully push your rosette circle down making sure your pretty edge is towards the outside to form the rosette shape. ( I hope this makes sense, I could not take a picture as I was doing this lol )
When Stuck down, ( use a good fast drying glue even hot glue )
You can then add another punched out shape for the centre and some bling on the top.
I just used an old button.
Hope this helps a little :)
Shaz
www.scrapbookingblossom.com.au
Mothers Day Gifts, Post it note holder
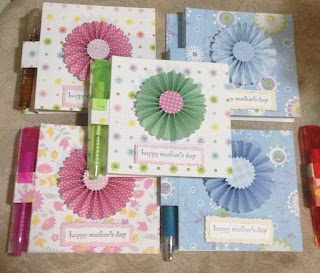
These are the Post it note gift holders I have made for the Mothers Day Stall at my son's school.
You will find the instructions on the post previous to this :)
I will upload next photos of how I made the rosettes on the front.
You can use the Tim Holtz die, If you don't have one, I have shown you how to make your own.
Pictures will be posted in 5 minutes :)
Post It Note Holders, Quick and Easy gifts!
Hello
So a lot of you liked the pictures I posted on Facebook of the Post it Note holders, I made for the School Mothers Day stand.
These are really so quick and easy.
My son wanted a green one so here is one I made real quick tonight, I mean in 10 Minutes!
That was including writing down the instructions and taking pics!!!
I hope the pictures are clear enough, If not please let me know and when I am making more tomorrow I will try to take better pictures and type instructions when I have more time :)
Let me know how you go :)
Shaz
www.scrapbookingblossom.com.au
Subscribe to:
Posts (Atom)


